Posts

Aquascaping: The Dry Start Method (Planting HC)

Image
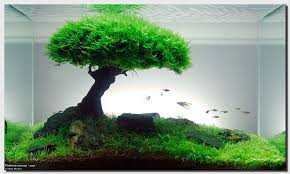
I did research on the best way I can start my tank and stumbled upon this method. It entails growing the plant emersed and getting it stable before flooding the tank. After the hardscape, I proceeded with preparing the HC(baby tears) for planting. Since it came planted in soil, I needed to wash and cut it to small portions before planting. I distributed the plants on the substrate evenly so it would cover the substrate faster. I had little time so I would postpone the planting of the hair grass for another day. I used a spray bottle to keep the tank moist and kept the water level barely below the lowest substrate level. After planting, I covered the tank with cling wrap to keep the temperature and humidity relatively high. I run the lights for 8 hours a day and spray/mist once a day. I also open the top once a day for a short while to exchange gasses. The hair grass will be used for accenting the rocks. I plan to run this for at least 3 weeks before flooding the tank.

Aquascaping: The Tank and the Cabinet

Image
The tank and the stand/cabinet would be the foundation of your setup. The tank I chose is a 15 gallon rimless tank with super clear/low iron glass. It has a curved corner that looks really good for that smooth transition. The tank came with a built in rubber matting at the bottom(not the traditional styro). The dimensions is 50cm x 30cm x 33cm. 33cm depth would give the aquascape more depth perception compared to narrow tanks. I haggled for it and got it for Php 1,300. Looking back, I should have gotten the 60cm x 30cm x 36cm tank I saw in a nearby pet store. The cabinet is the other important part of the setup. Some use a steel frame for their aquarium stands. I prefer to use a wooden cabinet to house the equipments and supplies. My goal is to keep the equipment visibility very minimal. I would keep the filter, co2 tanks, electrical and reactors hidden inside the cabinet while exposing only the water lines in the tank. This would keep the hi tech stuff away from a natural scene

Aquascaping: Hardscape and the Flora

Image
Now that the tank is in place, the hardscaping can now begin. Here is the list of materials I will be using: bonsai driftwood sculpture rocks (lava and some basalt like stones I picked up along the road) 8 liters aqua soil I put the driftwood in first and position it using the golden ratio. I then poured the soil around the driftwood. The usual setup is a higher level at the back and lower level at the front to give depth. Lastly, I put in the rocks and contoured the landscape to imitate a gradual hilly slope. For the flora(plants), there will be 3 types I'm going to use. hemianthus callitrichoides(aka. dwarf baby tears) - this will be for carpet as it grows and spreads along the substrate. It has small leaves that makes it a good foreground plant. I got it for Php 150 from an online seller for a 2"x4" plastic container. I still  have some leftovers and plan on propagating them. eleocharis parvula (dwarf hair grass) - this will be for accenting some p

Aquascaping: Bonsai Driftwood

Image
The first in my aquascaping timeline would be to get equipments and supplies to start my tank. I intend to do this on the most efficient use of budget without sacrificing quality. To start off, I bought some tweety wood and lava rocks from Cartimar(the Mecca of Aquarists in the Philippines).  This would be the foundation of my aquascape. Materials: select driftwood pieces (preferably small and with lots of crooked branches) 1kg lava rock glue gun cyanoacrylate glue (super glue) Tools: drill pliers hack saw The base of the sculpture would rest on lava rocks. I arranged the rocks to provide a stable platform while still looking natural. This would be glued into place with hot glue. The next step is to select the base of the tree. This would be the roots, trunk and branches. I picked the most suitable base from the store and picked small pieces of driftwood that can be used as branches and roots. The base is attached to the rocks using hot glue while takin

Aquascaping: Prelude

Image
It's a deviation from the theme of this blog but I'll use this avenue to talk about my aquascaping journey. You can read about the formal definition of aquascaping from google so I'll skip that part. What brought me back to the aquarium hobby is the fact that my son wants to have an aquarium. I took this chance to start with aquascaping. I've had several aquarium during my younger days. I started with a traditional fish only freshwater aquarium then in college I got into saltwater reef aquarium. Through the hobby, I learned the science behind aquariums through research and mostly trial and error. My focus this time is a nature inspired aquarium. I saw lots of planted aquariums that mimic natural scenery and that gave me the inspiration to create one for my own. I specifically liked the bonsai tree in an underwater scene with school of small fishes swimming around it. This will be my goal. To set up a nano tank with a bonsai tree landscape. It would recreate a g

Review: Kirin Ichiban

Image
Japan's Prime Beer; as the label says. I got this one from a local convenience store. I wanted to try Japanese beer and found this one on the shelf.  I don't know what the "First Press" on the label means. Is it really a the first runnings of the mash or just a marketing ploy? It also boasts of 100% malt which is a thing for premium beers in Japan. The label on the side shows the local distributor of the beer. I'm also surprised to see that it was not produced in Japan. Japan's prime beer is made in China. This beer has 5% ABV which is a typical value  for beers. It has a golden colour and clear. There is no IBU value but the bitterness is on the level of San Miguel Light Beer. The 100% malt label lives up to its name. It's very malty flavour makes this beer very enjoyable. The malty taste has a bit of sweetness in the end without being very heavy on the palate.  One can is not enough. 2 to 3 cans of this will definitely

Review: Pedro's Beer

Image
Last year, I bought a set of Pedro's beer . Pedro is a locally brewed beer produced in my current home town, San Pedro, Laguna. It's a micro brewery that offers a nice set of beer variants. It's a bit difficult to get a hold of these unless you go to a specialty bar which offers local craft beers. Luckily, they have started to offer it in Family Mart, a local convenience store. A bottle costs 150php but at that time they were having a buy 3 get 1 promo so I took the opportunity to sample their beer variants. I got the two Endless Summer Wheat Ales, Procrastination Pale Ale and the Elementary English Ale. They have another flavour, the Wondering Wonderer India Pale Ale which I have yet to try. The Endless Summer Wheat Ale is wheat beer. It has 5% ABV and 13 IBU. Like every other wheat beers, it is citrusy and refreshing. Perfect when lounging in the summer afternoon or even watching a movie. You cannot go wrong with this variant. The Procrastination Pale Ale is mo